Restoring wheel arches with fibreglass
Posted: Thu Jul 02, 2015 11:57 pm
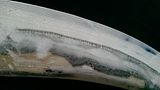
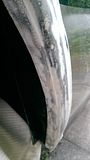
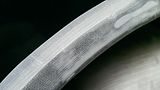
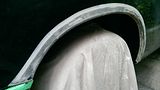
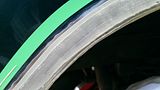
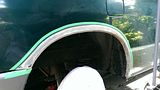
Thought I'd post a couple of pics showing how I tackled rust erosion on my offside Bongo wheel arch last week. I'm very happy with the job. Its an experiment and only time will tell how ell its worked, but the result is very acceptable. For now I've not gone for a perfect finish but have made a feature out of it by using nearly matching green hammerite (achieved by mixing green and black smooth finish hammerite) to give a wheel arch trim effect. Big advantages of fibreglass DIY job over welding are:
* Costs much less
* Can be done in a spare day of dry weather
* No loss of car use while its in having major welding work done
* No heat issues (wiring, fire risk, loss of internal waxoyl protection)
* Can be refreshed as and when rust recurs
* Even new welded arches are said to start rusting again over time
You need:
* PVC masking tape
* Toffee wheel for grinding off paint and rust but not good metal
* Kurust or similar for painting on residual rust
* Woven fibreglass tape
* Fibreglass resin
* Fibreglass filler (P38)
* Superglue (and Zap Kicker to set it off it its being a bit slow)
* Sprung steel rule or similar (to hold new fibreglass edging in place whilst tacking it with superglue)
* Wet and dry paper and sanding block
* Dinitrol for finishing off protection of inner arch
* Flat plank for waxing and using to cast some stock fibreglass strip
* Cellulose thinner for cleaning off resin
* Disposable brushes for applying resin
* Dust mask and safety goggles for protection when toffee wheel grinding
* suitable disposable(foil) trays for mixed resin
Points to note:
* Make up a suitable length of fibreglass strip by casting it against a waxed flat surface
* Cut a suitable width from that to make a new edging piece for the arch lip. This will be used to make a good clean curve built over
the inevitably buckled edge of the rust affected lip/seam
* Gently hammer proud areas of the arch lip to countersink them
* Mask off limit of work area with PVC masking tape
* Toffee wheel off all paint and rust as close as possible to masked edge
* Treat any remaining rust with Kurust (though I omitted this due to lack of time)
* Use sprung steel rule to hold new fibreglass edge in place in a clean curve whilst tack gluing it in place with superglue
* Mix resin and wick it into the gap between fibreglass edge
* Fill out remaining gap and any substantial holes with P38
* Toffee wheel then wet and dry to take off surplus and create the edge of the arch.
* Build a fillet of P38 (a disposable gloved finger is the best moulding tool) behind the new fibreglass edge to give it strength
through depth
* Once happy with the profile, mix and brush resin over the masked area and apply fibreglass bandage (in about 5 sections with
short overlap as it won't follow the curve of the arch if in one long piece) and work it around to cover the edge/seam also.
* Fillet in P38 between edge of fibreglass tape and masking tape and to cover any remaining weave
* Remask a few mm back from original work line.
* Wet and dry using a sanding block and plenty of water with detergent for best effect
* When happy with surface, apply hammerite using a piece of foam rubber and using a stipple action to give an even effect.
* Protect inside of arch by applying Dinitrol
Note that resin is impervious to moisture whilst P38 is not. Also, if/when this technique looks likely to last (and I'm very hopeful it will) I can always wet and dry to remove the hammerite, do a bit more work on finishing with fine wet and dry and P38, and then spray to blend with existing paintwork. But I think making a feature of the work is a quicker and better option really.
Here's a few pics, though I haven't taken one of the painted job - sorry! (click pic to enlarge)
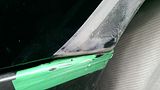
I also did a similar repair on the bottom of my tailgate. Took about 2hrs to overlay fibreglass on the outside invisibly, open up seams, remove rust, apply kurust then resin then seam sealer then hammerite it all. V pleased with result
* Costs much less
* Can be done in a spare day of dry weather
* No loss of car use while its in having major welding work done
* No heat issues (wiring, fire risk, loss of internal waxoyl protection)
* Can be refreshed as and when rust recurs
* Even new welded arches are said to start rusting again over time
You need:
* PVC masking tape
* Toffee wheel for grinding off paint and rust but not good metal
* Kurust or similar for painting on residual rust
* Woven fibreglass tape
* Fibreglass resin
* Fibreglass filler (P38)
* Superglue (and Zap Kicker to set it off it its being a bit slow)
* Sprung steel rule or similar (to hold new fibreglass edging in place whilst tacking it with superglue)
* Wet and dry paper and sanding block
* Dinitrol for finishing off protection of inner arch
* Flat plank for waxing and using to cast some stock fibreglass strip
* Cellulose thinner for cleaning off resin
* Disposable brushes for applying resin
* Dust mask and safety goggles for protection when toffee wheel grinding
* suitable disposable(foil) trays for mixed resin
Points to note:
* Make up a suitable length of fibreglass strip by casting it against a waxed flat surface
* Cut a suitable width from that to make a new edging piece for the arch lip. This will be used to make a good clean curve built over
the inevitably buckled edge of the rust affected lip/seam
* Gently hammer proud areas of the arch lip to countersink them
* Mask off limit of work area with PVC masking tape
* Toffee wheel off all paint and rust as close as possible to masked edge
* Treat any remaining rust with Kurust (though I omitted this due to lack of time)
* Use sprung steel rule to hold new fibreglass edge in place in a clean curve whilst tack gluing it in place with superglue
* Mix resin and wick it into the gap between fibreglass edge
* Fill out remaining gap and any substantial holes with P38
* Toffee wheel then wet and dry to take off surplus and create the edge of the arch.
* Build a fillet of P38 (a disposable gloved finger is the best moulding tool) behind the new fibreglass edge to give it strength
through depth
* Once happy with the profile, mix and brush resin over the masked area and apply fibreglass bandage (in about 5 sections with
short overlap as it won't follow the curve of the arch if in one long piece) and work it around to cover the edge/seam also.
* Fillet in P38 between edge of fibreglass tape and masking tape and to cover any remaining weave
* Remask a few mm back from original work line.
* Wet and dry using a sanding block and plenty of water with detergent for best effect
* When happy with surface, apply hammerite using a piece of foam rubber and using a stipple action to give an even effect.
* Protect inside of arch by applying Dinitrol
Note that resin is impervious to moisture whilst P38 is not. Also, if/when this technique looks likely to last (and I'm very hopeful it will) I can always wet and dry to remove the hammerite, do a bit more work on finishing with fine wet and dry and P38, and then spray to blend with existing paintwork. But I think making a feature of the work is a quicker and better option really.
Here's a few pics, though I haven't taken one of the painted job - sorry! (click pic to enlarge)


I also did a similar repair on the bottom of my tailgate. Took about 2hrs to overlay fibreglass on the outside invisibly, open up seams, remove rust, apply kurust then resin then seam sealer then hammerite it all. V pleased with result

