


Sorry I’ve not been posting much on here lately. I've been busy with loads of other stuff BUT rest assured the Bongo is still Numero Uno in my life, and I’m still having fun tending to its needs, and getting great use out of it. I spent 8 days camping in it at the gliding club in Oxfordshire, and did the Bongo Bash in June. No other outings, but then that’s when the Bongo comes into its own, as its still great as a family car, MPV and fun everyday drive (provided I trim the miles to my fuel budget!). And it continues to be fingers crossed) totally reliable, so overall running cost is most likely cheaper than a fuel efficient modern thing that will as like as not throw a big bill at me. I did admire a converted Hiace when there though, as it offered ready-to-go beds and cooking, which is attractive as I get older and lazier, and its still reasonably compact. It seemed to drive well and handle OK too, and suspension was perhaps less fussy over bumps than my Bongo. But It’s not a Bongo though, on looks, overall nimbleness, or ease of parking and manoeuvring, and it would cost a lot more than my Bongo did. And fuel consumption is worse
Anyway, I digress. Yesterday’s weather in Manchester (only, for a change) was perfect for attending to the small rust bubbles appearing on my rear wheel arches. I know I’m never going to beat the relentless tinworm, but I’m going ot hold it back as best I can. And I got a great result yesterday. My first decision was to accept that the 1”-2” wide band of rear wing that adjoins the arch was going to be the area where bubbles were most likely to appear, and where new bits would have to be tackled. So I masked off (on each wing) a nice curved line just about at the point where the arches flare a little. If I had had more time and patience, a better approach would have been to make up a mask using corrugated cardboard (as I did do for the smaller area where I had to grind out rust, refill and respray). The advantage of a mask over taping is that, provided you spray with care, you can create a soft join between old and new paintwork and thus blend (to some extent) old and new. I decided though that making a small ‘feature’ out of the ‘repair zone’ would be fine, as I was not looking to do achieve a fully professional look within that zone.
Having done this, I using a paint stripping wheel in the electric drill, and started taking of paint to get down to bare metal. Not all areas showed shining metal. I poked those with a sharp bradawl and – sure enough – I broke through into the interior (and out the other side in some cases). I noticed too how the inner wing and outer wing seam seemed to have become gapped. I reckoned the vehicle wasn’t built like this, so it must be due to slow rust action. I reamed out the gap with the bradawl, and got what looked like fine, dry soil, maybe rusty coloured but not obviously rust. I poked around in the holes in the wing (they were only small, so I couldn’t do much) to dislodge as much rust flake as possible and clean up the interior.
Next, I removed the interior plastic cup/object rear holder in order to gain access to the inner/outer wing joins from the inside. I opted to squirt lots of WD40 down there so that it could run/wick into the seam and maybe slow things down. Last time I did this ( 3 years ago) I used Kurust and then engine oil, but this is tricky to deliver to target when compared with WD40 from a spray can fitted with a delivery tube.
Also, whatever I used would be running into the area where I wanted to fill with P40 then paint, so I preferred something that could be wicked off the area with a cloth (which oil could not be). I also squirted WD40 in to the seam gap from the exterior (wheel arch area).
Now I cleaned up surplus WD40 from the area to be filled with P40. I realised that the P40 would not bond, due to the WD40, but reckoned that it would hold firm by pressing it into the holes I was filling so that that it spread out on the interior, locking the repair into the bodywork.
Having done that, with two applications of P40, wet and dry sanded back to flush with the metal work, I applied Zinc primer from a spray can (several thin coats) with the area masked by a piece of corrugated cardboard, cut to give a curved mask. With all spraying, I ensured I didn’t spray more than necessary in the direction of the masking edge, as I wanted to use the thickness of the cardboard to create a soft edge using a ‘shadowing effect. With the primer on, I moved the mask back a bit then sprayed on the top coat (with paint gun and compressor, as I have those, but cans should still give an acceptable result).
Once that was done, I removed the mask and sprayed the whole wheel arch ‘zone’ with 2-pack clear lacquer. I reasoned that the ageing lacquer was brittle and likely to let moisture through, fuelling any rusting, so a new coat over the whole area wouldn’t do any harm.
The WD40 could be seen sweating just a little through the P40 and the zinc primer, but I pressed on regardless and all paint seemed to bond OK.
Finally, with the paintwork done, I got some Dinitrol (quality thick black underseal like material – I got some off ebay for around £14 and keep it for touch up work, as my Bongo is fully Dinitroled underneath) and used it to fill up (as much as possible) the exterior seam gap between inner and outer wings.
It remains to be seen how long this repair lasts, but I thought I’d post this so that anyone searching in the future can PM me for an update on how well this repair has worked. My personal guess? Well I reckon stuff will continue to come through, in new places, and I shall have to repeat the exercise as and when. But a bad portion of the n/s wing (right at the front, where the paintwork is silent silver) has gone for 2 years from when I treated and repaired it (but now needs another go), and if I can go along like that, then I think it will have been worth the effort. And the result is, if not invisible, really quite smart, for a quick non-pro job.
Tackling the Tenacious Tinwom (on rear wheel arches)
Moderators: Doone, westonwarrior

Re: Tackling the Tenacious Tinwom (on rear wheel arches)
For squirting into gaps, I can't recomend ACF50 too highly. It has seen my bike through five winters of being kept outside. You can get it as aerosol or bottle and the bottle one comes with a little pump sprayer for the best of both worlds. It is made for aircraft maintenance but bikers swear by it. I keep some handy and spray some on anything I spot corrosion on plus the places you mention and inside the sills. The beauty is that it travels and forms a self healing skin. Just keep it away from the brake pads! Always wipe off any excess.
mikeonb4c wrote:Sorry I’ve not been posting much on here lately. I've been busy with loads of other stuff BUT rest assured the Bongo is still Numero Uno in my life, and I’m still having fun tending to its needs, and getting great use out of it. I spent 8 days camping in it at the gliding club in Oxfordshire, and did the Bongo Bash in June. No other outings, but then that’s when the Bongo comes into its own, as its still great as a family car, MPV and fun everyday drive (provided I trim the miles to my fuel budget!). And it continues to be fingers crossed) totally reliable, so overall running cost is most likely cheaper than a fuel efficient modern thing that will as like as not throw a big bill at me. I did admire a converted Hiace when there though, as it offered ready-to-go beds and cooking, which is attractive as I get older and lazier, and its still reasonably compact. It seemed to drive well and handle OK too, and suspension was perhaps less fussy over bumps than my Bongo. But It’s not a Bongo though, on looks, overall nimbleness, or ease of parking and manoeuvring, and it would cost a lot more than my Bongo did. And fuel consumption is worse
Anyway, I digress. Yesterday’s weather in Manchester (only, for a change) was perfect for attending to the small rust bubbles appearing on my rear wheel arches. I know I’m never going to beat the relentless tinworm, but I’m going ot hold it back as best I can. And I got a great result yesterday. My first decision was to accept that the 1”-2” wide band of rear wing that adjoins the arch was going to be the area where bubbles were most likely to appear, and where new bits would have to be tackled. So I masked off (on each wing) a nice curved line just about at the point where the arches flare a little. If I had had more time and patience, a better approach would have been to make up a mask using corrugated cardboard (as I did do for the smaller area where I had to grind out rust, refill and respray). The advantage of a mask over taping is that, provided you spray with care, you can create a soft join between old and new paintwork and thus blend (to some extent) old and new. I decided though that making a small ‘feature’ out of the ‘repair zone’ would be fine, as I was not looking to do achieve a fully professional look within that zone.
Having done this, I using a paint stripping wheel in the electric drill, and started taking of paint to get down to bare metal. Not all areas showed shining metal. I poked those with a sharp bradawl and – sure enough – I broke through into the interior (and out the other side in some cases). I noticed too how the inner wing and outer wing seam seemed to have become gapped. I reckoned the vehicle wasn’t built like this, so it must be due to slow rust action. I reamed out the gap with the bradawl, and got what looked like fine, dry soil, maybe rusty coloured but not obviously rust. I poked around in the holes in the wing (they were only small, so I couldn’t do much) to dislodge as much rust flake as possible and clean up the interior.
Next, I removed the interior plastic cup/object rear holder in order to gain access to the inner/outer wing joins from the inside. I opted to squirt lots of WD40 down there so that it could run/wick into the seam and maybe slow things down. Last time I did this ( 3 years ago) I used Kurust and then engine oil, but this is tricky to deliver to target when compared with WD40 from a spray can fitted with a delivery tube.
Also, whatever I used would be running into the area where I wanted to fill with P40 then paint, so I preferred something that could be wicked off the area with a cloth (which oil could not be). I also squirted WD40 in to the seam gap from the exterior (wheel arch area).
Now I cleaned up surplus WD40 from the area to be filled with P40. I realised that the P40 would not bond, due to the WD40, but reckoned that it would hold firm by pressing it into the holes I was filling so that that it spread out on the interior, locking the repair into the bodywork.
Having done that, with two applications of P40, wet and dry sanded back to flush with the metal work, I applied Zinc primer from a spray can (several thin coats) with the area masked by a piece of corrugated cardboard, cut to give a curved mask. With all spraying, I ensured I didn’t spray more than necessary in the direction of the masking edge, as I wanted to use the thickness of the cardboard to create a soft edge using a ‘shadowing effect. With the primer on, I moved the mask back a bit then sprayed on the top coat (with paint gun and compressor, as I have those, but cans should still give an acceptable result).
Once that was done, I removed the mask and sprayed the whole wheel arch ‘zone’ with 2-pack clear lacquer. I reasoned that the ageing lacquer was brittle and likely to let moisture through, fuelling any rusting, so a new coat over the whole area wouldn’t do any harm.
The WD40 could be seen sweating just a little through the P40 and the zinc primer, but I pressed on regardless and all paint seemed to bond OK.
Finally, with the paintwork done, I got some Dinitrol (quality thick black underseal like material – I got some off ebay for around £14 and keep it for touch up work, as my Bongo is fully Dinitroled underneath) and used it to fill up (as much as possible) the exterior seam gap between inner and outer wings.
It remains to be seen how long this repair lasts, but I thought I’d post this so that anyone searching in the future can PM me for an update on how well this repair has worked. My personal guess? Well I reckon stuff will continue to come through, in new places, and I shall have to repeat the exercise as and when. But a bad portion of the n/s wing (right at the front, where the paintwork is silent silver) has gone for 2 years from when I treated and repaired it (but now needs another go), and if I can go along like that, then I think it will have been worth the effort. And the result is, if not invisible, really quite smart, for a quick non-pro job.
[url]http://germanshepherdrescue.co.uk/[/url]
-
Northern Bongolow

- Supreme Being
- Posts: 7724
- Joined: Mon Mar 15, 2010 11:33 pm
- Location: AKA Vanessa
-
mikeonb4c
- Supreme Being
- Posts: 22877
- Joined: Sun Nov 05, 2006 10:49 pm
- Location: Living with Mango Bongo in the North West but with a tendency to roam
- Contact:
Re: Tackling the Tenacious Tinwom (on rear wheel arches)
Sounds like good stuff - I seem to recall you mentioning it before. Should have got some 
Re: Tackling the Tenacious Tinwom (on rear wheel arches)
Yes I use it as penetrating oil too.mikeonb4c wrote:Sounds like good stuff - I seem to recall you mentioning it before. Should have got some
[url]http://germanshepherdrescue.co.uk/[/url]

Re: Tackling the Tenacious Tinwom (on rear wheel arches)
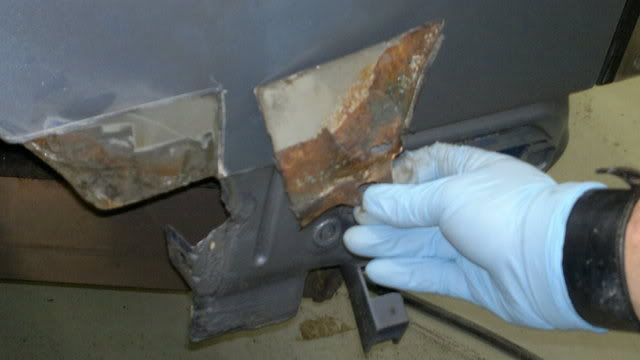
wish mine had such a happy ending -all set to go, paint and filler at the ready -unfortunately the holes in my wheel arch are not small at all -way beyond a home fix.  had it been any ordinary vehicle that would be it -time to chuck in the towel, but not the bongo having struggled to get it on the road for most of this year so far i will not be giving up without a fight.
-
mikeonb4c
- Supreme Being
- Posts: 22877
- Joined: Sun Nov 05, 2006 10:49 pm
- Location: Living with Mango Bongo in the North West but with a tendency to roam
- Contact:
Re: Tackling the Tenacious Tinwom (on rear wheel arches)
Spot on - they are worth more fighting for than just any old car. To other owners, I recommend biting the bullet as soon as rust spots appear, rather than putting it off. Mind you, I don't think there are any miracles where tinworm is concerned. Just gotta try your best.karena wrote:wish mine had such a happy ending -all set to go, paint and filler at the ready -unfortunately the holes in my wheel arch are not small at all -way beyond a home fix.
Good luck Karen
Mike
xxxx
-
mikexgough

- Supreme Being
- Posts: 6158
- Joined: Mon Sep 08, 2008 9:02 pm
- Location: Cambridgeshire - where the all the Slodgers reside
- Contact:
Re: Tackling the Tenacious Tinwom (on rear wheel arches)
Conversant with Bongo Top Pinion Oil Seals
Bongo owning Velotech Cycle Mechanic
Bongo owning Velotech Cycle Mechanic
-
mikeonb4c
- Supreme Being
- Posts: 22877
- Joined: Sun Nov 05, 2006 10:49 pm
- Location: Living with Mango Bongo in the North West but with a tendency to roam
- Contact:
Re: Tackling the Tenacious Tinwom (on rear wheel arches)
One thing I'm still not 100% sure on after readfing up on it is whether it is v. low viscosity and can be relied on to 'wick' into the inner and outer wing seams simply be spraying/squirting (using one of those thin delivery tubes like WD40 cans come with) it using the opening for the rearmost seats passenger cubby hole openings. By delivering it therE, a suitably runny material should make good progress running in a stream down the wheel arch interior, soaking into the gap between inner and outer wings as it goes. thats the theory. Waxoyl etc. is never going to manage that I fear. And amongst the stuff I read (Amazon reviews I think) on ACF50, was a suggestion that it might be a bit on the viscous side. Other than that, it sounds like good stuff.
-
mikexgough
- Supreme Being
- Posts: 6158
- Joined: Mon Sep 08, 2008 9:02 pm
- Location: Cambridgeshire - where the all the Slodgers reside
- Contact:
Re: Tackling the Tenacious Tinwom (on rear wheel arches)
Local Motorbike shop reckons it's the dogs danglies...I picked up a can....I could ask him to "stock" me up if a group buy was on the cards........ He reckoned it makes any existing rust...dead...so if that was 100% it could halt the tin worm.....it does have a 2 yr lifespan.....but group buy and all that....mikeonb4c wrote:One thing I'm still not 100% sure on after readfing up on it is whether it is v. low viscosity and can be relied on to 'wick' into the inner and outer wing seams simply be spraying/squirting (using one of those thin delivery tubes like WD40 cans come with) it using the opening for the rearmost seats passenger cubby hole openings. By delivering it therE, a suitably runny material should make good progress running in a stream down the wheel arch interior, soaking into the gap between inner and outer wings as it goes. thats the theory. Waxoyl etc. is never going to manage that I fear. And amongst the stuff I read (Amazon reviews I think) on ACF50, was a suggestion that it might be a bit on the viscous side. Other than that, it sounds like good stuff.
Conversant with Bongo Top Pinion Oil Seals
Bongo owning Velotech Cycle Mechanic
Bongo owning Velotech Cycle Mechanic
-
mikeonb4c
- Supreme Being
- Posts: 22877
- Joined: Sun Nov 05, 2006 10:49 pm
- Location: Living with Mango Bongo in the North West but with a tendency to roam
- Contact:
Re: Tackling the Tenacious Tinwom (on rear wheel arches)
As long its v low viscosity and can flow/wick into the seam, as I reckon that is going to be a key factor in achieving success.mikexgough wrote:Local Motorbike shop reckons it's the dogs danglies...I picked up a can....I could ask him to "stock" me up if a group buy was on the cards........ He reckoned it makes any existing rust...dead...so if that was 100% it could halt the tin worm.....it does have a 2 yr lifespan.....but group buy and all that....mikeonb4c wrote:One thing I'm still not 100% sure on after readfing up on it is whether it is v. low viscosity and can be relied on to 'wick' into the inner and outer wing seams simply be spraying/squirting (using one of those thin delivery tubes like WD40 cans come with) it using the opening for the rearmost seats passenger cubby hole openings. By delivering it therE, a suitably runny material should make good progress running in a stream down the wheel arch interior, soaking into the gap between inner and outer wings as it goes. thats the theory. Waxoyl etc. is never going to manage that I fear. And amongst the stuff I read (Amazon reviews I think) on ACF50, was a suggestion that it might be a bit on the viscous side. Other than that, it sounds like good stuff.

Re: Tackling the Tenacious Tinwom (on rear wheel arches)
Sorry to put a dampner on things but i have my doubts about this, to prevent corrosion getting any worse it must be completely airtight which i doubt this would achieve. I am also a biker and think it would be great on the bike for commuting in all weathers. After working in bodyshops since leaving school i still think waxoyl (applied properly) is the best product. Just use a proper waxoyl gun and lance and use plenty of product to ensure coverage and it will last for years.
Do what you like.Like what you do.
-
mikeonb4c
- Supreme Being
- Posts: 22877
- Joined: Sun Nov 05, 2006 10:49 pm
- Location: Living with Mango Bongo in the North West but with a tendency to roam
- Contact:
Re: Tackling the Tenacious Tinwom (on rear wheel arches)
....if you can get it to wick into the seam. My attempt with waxoyl failed dismally. Maybe I should have thinned it with white spirit to make it into a runny liquid?stuc wrote:Sorry to put a dampner on things but i have my doubts about this, to prevent corrosion getting any worse it must be completely airtight which i doubt this would achieve. I am also a biker and think it would be great on the bike for commuting in all weathers. After working in bodyshops since leaving school i still think waxoyl (applied properly) is the best product. Just use a proper waxoyl gun and lance and use plenty of product to ensure coverage and it will last for years.
-
gill+berniebann
Re: Tackling the Tenacious Tinwom (on rear wheel arches)
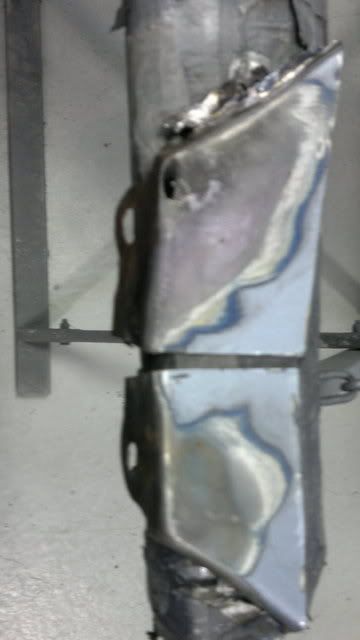 thes[img]mine went
-
gill+berniebann
 bothsides