


On an arch you have a lip - in and outside, the inner circular bit of the arch which gets the road spray right on it, the large panel area above the lip (main body) So far I seem ok but you can never be too early preventing.
I typically spray a load of Waxoyl (clear and not underseal version) directly under the arches and all above the lip inside come September and smear a load over the entire lip edges even slightly onto the painted edge where it meets the body work. Hoping this repels water from most places through the winter months.
I had heard they can rust from the inside. And with this, assumed from condensation sitting on the rear inside the arches.
Where is most typical for the arches to start rusting ? Thanks.
Rear arch rust.. where on the arch typically ?
Moderators: Doone, westonwarrior
-
BongoBongo123
- Supreme Being
- Posts: 1697
- Joined: Sat Jun 07, 2014 10:14 pm
Rear arch rust.. where on the arch typically ?
They call me light foot.

Re: Rear arch rust.. where on the arch typically ?
Geoff's pictures give a very good picture of bongo rust development. They certainly do suffer from condensation between the skins.
On my van I remove the pockets above the rear arches inside and pour waxoyl directly onto the seam between inner and outer.
On my van I remove the pockets above the rear arches inside and pour waxoyl directly onto the seam between inner and outer.
Re: Rear arch rust.. where on the arch typically ?
Hi
Part of the problem is that the rear arches are only spot welded at the ends the center portion is not. Here the inner arch is glued to the quarter panel and over time this adhesive gives way allowing the quarter panel to flex.
So to effectively reduce the chances of rusting here you would need to pull off the interior panels and treat the arch from the inside using a dilute solution of wax and white spirit. I found the best way to deliver this solution to that area is by using a Turkey baster with a length of windscreen washer hose attached to the end to allow for a more precise deployment of the mix add it slowly to reduce the amount of run off. Just carried out a wax up for a customer of mine he had the full bit with all panels and headlining removed and I used this method with good effect.
So..
This initial mix needs to be around 50/50 WS and wax after leaving it for an hour or so follow it up with another batch this time around 20% WS mix. The trick is to get the solution in between the failed adhesive and the panels. In this weather it may help penetration by warming the arch from the outside with a hot air gun be careful you dont over heat the panel and bubble the paintwork though.
While you have those panels off you can get access to the inner sill on the drivers side also. it would be a good time to treat that too.If you have the rear heater in the way you can just pour some down the back(a bit hit and miss but it should help) as this is another area affected, probably due to condensation build up from the heater unit.
If you look under the drivers side rear inner wheel arch you will see a couple of grommets removing these will also allow access to apply wax to that area.
At the rear of the arch you will see a couple more these give access to the rear vent /box section it would be good to get some in here also.
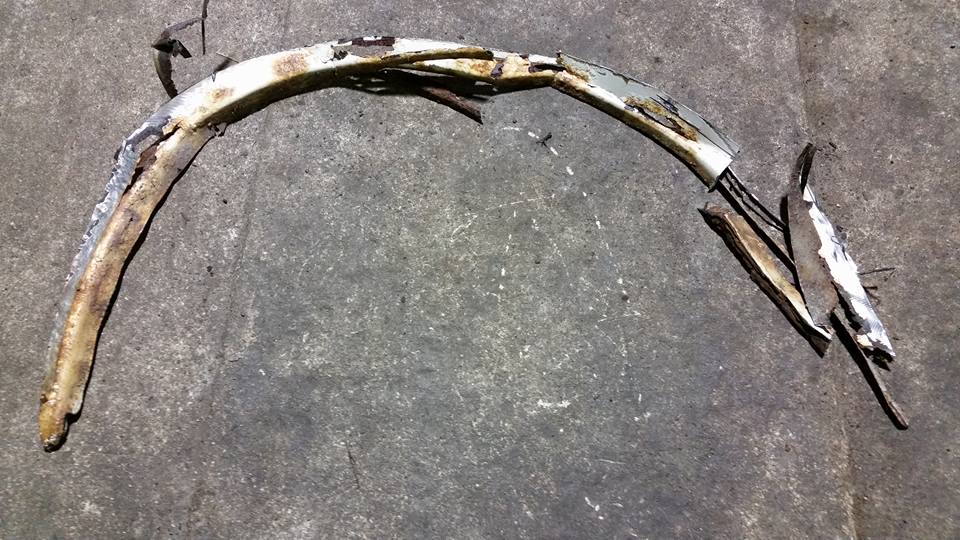
Here are a couple of images showing the outer skin removed.
In the first you can see the adhesive hanging. In the second you can see the upright area in the centre of the arch that forms the face for the adhesive to bond to.
Have a look here on Page 5 about the 5th post down.
http://igmaynard.co.uk/bongo/forum/view ... 7&start=60
Good luck!
Part of the problem is that the rear arches are only spot welded at the ends the center portion is not. Here the inner arch is glued to the quarter panel and over time this adhesive gives way allowing the quarter panel to flex.
So to effectively reduce the chances of rusting here you would need to pull off the interior panels and treat the arch from the inside using a dilute solution of wax and white spirit. I found the best way to deliver this solution to that area is by using a Turkey baster with a length of windscreen washer hose attached to the end to allow for a more precise deployment of the mix add it slowly to reduce the amount of run off. Just carried out a wax up for a customer of mine he had the full bit with all panels and headlining removed and I used this method with good effect.
So..
This initial mix needs to be around 50/50 WS and wax after leaving it for an hour or so follow it up with another batch this time around 20% WS mix. The trick is to get the solution in between the failed adhesive and the panels. In this weather it may help penetration by warming the arch from the outside with a hot air gun be careful you dont over heat the panel and bubble the paintwork though.
While you have those panels off you can get access to the inner sill on the drivers side also. it would be a good time to treat that too.If you have the rear heater in the way you can just pour some down the back(a bit hit and miss but it should help) as this is another area affected, probably due to condensation build up from the heater unit.
If you look under the drivers side rear inner wheel arch you will see a couple of grommets removing these will also allow access to apply wax to that area.
At the rear of the arch you will see a couple more these give access to the rear vent /box section it would be good to get some in here also.
Here are a couple of images showing the outer skin removed.
In the first you can see the adhesive hanging. In the second you can see the upright area in the centre of the arch that forms the face for the adhesive to bond to.
Have a look here on Page 5 about the 5th post down.
http://igmaynard.co.uk/bongo/forum/view ... 7&start=60
Good luck!
-
BongoBongo123
- Supreme Being
- Posts: 1697
- Joined: Sat Jun 07, 2014 10:14 pm
Re: Rear arch rust.. where on the arch typically ?
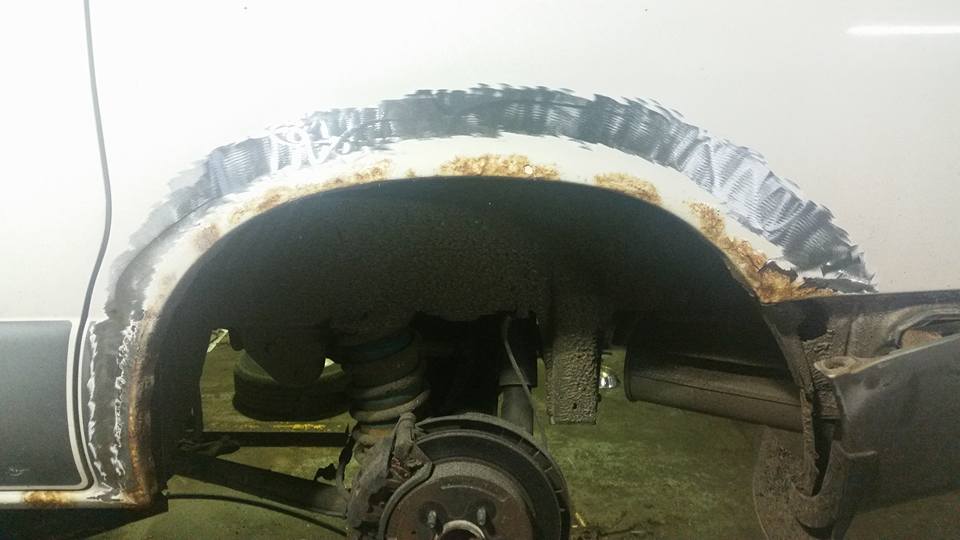
Thanks, seems like the lip is a vulnerable spot judging by the first photos. With regards to inner rear access it is possible on one side but much more complicated on ours on the driver side as it has a narrow side conversion making access very awkward. Nothing showing as yet but good to know more.
Deep access/application info there Bongolia, much obliged.
Thanks as always.
Deep access/application info there Bongolia, much obliged.
Thanks as always.
They call me light foot.
Re: Rear arch rust.. where on the arch typically ?
If you undo the rear light cluster then its possible to inject waxoil using a long probe to go down the side of the van as there are access holes behind the light cluster. Also if you have an EHU socket or a waterfiller on the offside of the van you can use them to gain access as well on the offside.
Geoff
2001 Aero V6, AFT, full side conversion.
2001 Aero V6, AFT, full side conversion.
-
BongoBongo123
- Supreme Being
- Posts: 1697
- Joined: Sat Jun 07, 2014 10:14 pm
Re: Rear arch rust.. where on the arch typically ?
That sounds good.. and it accesses this inner arch lip? Presumably in a somewhat "blind" manner as an access hole is probably quite small to thread some kind of Waxoyl pumping tube in ?g8dhe wrote:If you undo the rear light cluster then its possible to inject waxoil using a long probe to go down the side of the van as there are access holes behind the light cluster. Also if you have an EHU socket or a waterfiller on the offside of the van you can use them to gain access as well on the offside.
Not sure yet but come end of summer I may plan a big Waxoyl "deployment", bigger than my usual annual exterior one. Depends on time somewhat but I would love to sort the sills out internally and if possible these arches seem sensible to sort.
Any idea off the top of your head of the diameter of the rear light access holes ?
They call me light foot.
Re: Rear arch rust.. where on the arch typically ?
The skin and inner wheel arch are like this, its where the inner arch touches the skin and condensation gathers that the rust starts;
Geoff
2001 Aero V6, AFT, full side conversion.
2001 Aero V6, AFT, full side conversion.
Re: Rear arch rust.. where on the arch typically ?
Lovely post Geoff, where did you get that image from?BongoBongo123 wrote:Thanks, seems like the lip is a vulnerable spot judging by the first photos. With regards to inner rear access it is possible on one side but much more complicated on ours on the driver side as it has a narrow side conversion making access very awkward. Nothing showing as yet but good to know more.
Deep access/application info there Bongolia, much obliged.
Thanks as always.
123
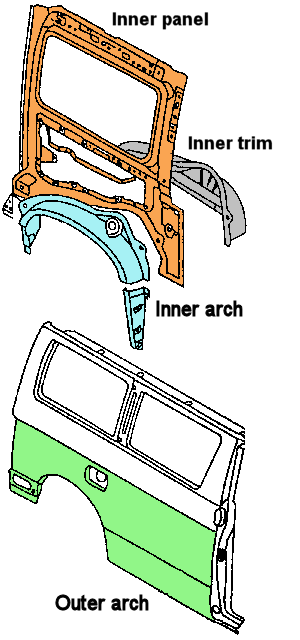
Actually the Bongo has loads of grommets dotted about and strangely they are in the places you would expect to find the rust
Re: Rear arch rust.. where on the arch typically ?
Thinking it may be a useful addition for the Bongo Rust Prevention Brigade to have images of where these grommets are and what panels they cover. If I get time next week I will do some photos and post them on here.
Maybe someone could compile them into a fact sheet. I am crepe at that sort of thing.
Maybe someone could compile them into a fact sheet. I am crepe at that sort of thing.
Re: Rear arch rust.. where on the arch typically ?
Splendid idea. 
Re: Rear arch rust.. where on the arch typically ?
The image was cut and pasted from the mech. diagrams site such as http://www.lushprojects.com/bongopartsmk2/
specifically from http://lushprojects.com/bongopartsmk2/c ... mgno=.html
and then just coloured in to highlight the rust prone areas.
specifically from http://lushprojects.com/bongopartsmk2/c ... mgno=.html
and then just coloured in to highlight the rust prone areas.
Geoff
2001 Aero V6, AFT, full side conversion.
2001 Aero V6, AFT, full side conversion.
-
BongoBongo123
- Supreme Being
- Posts: 1697
- Joined: Sat Jun 07, 2014 10:14 pm
Re: Rear arch rust.. where on the arch typically ?
Superb information and explanation of why it is such a vulnerable area. Should be a sticky post ! Thanks for information which will be helpful to all. I may try and get a light casing off in summer to see what is what when it is dry and see what kind of pump to purchase. (Is it fiddly or quite easy? I know for some cars it is simply a few nylon butterfly wing nuts in the boot) All best done at season end as I suspect the entombed Waxoyl could pong on for a while.
They call me light foot.
-
mikeonb4c
- Supreme Being
- Posts: 22877
- Joined: Sun Nov 05, 2006 10:49 pm
- Location: Living with Mango Bongo in the North West but with a tendency to roam
- Contact:
Re: Rear arch rust.. where on the arch typically ?
One dilemma thats always concerned me is that if you think you may need to have welding done, you don't want to waxoyl etc until after welding is done because:
1) Waxoyl (fresh especially but anyway) greatly increases fire risk when welding
2) Waxoyl gives off smoke and fumes possibly requiring breathing apparatus be worn
3) the waxoyl itself may get burned off or melted away in the area surrounding the welding, so will in any case need redoing after welding. I wonder if for that reason it needs to be discussed with the welder how access can be ensured for waxoyl injection (for example if the old metal had grommet holes, should the new metal have similar)